I have a few vehicles that run slower than others. In particular my black Firebird. I have done everything I’ve learned about maintenance on it and it still runs slow. The only thing I haven’t done is change the motor. I’m open for suggestions.
-
Please sign in or join the US1 Trucking club free to access the search page and many other free site features.
If you forgot your password click here -
Please sign in or join the US1 Electric Trucking club free to access the search page and many other free site features.
If you forgot your password click here
You are using an out of date browser. It may not display this or other websites correctly.
You should upgrade or use an alternative browser.
You should upgrade or use an alternative browser.
Notice: This site contains affiliate links for which I may be compensated. As an eBay Partner, and Amazon Associate I may be compensated if you make a purchase at no cost to you. Thank you for your support!
Runs slow can be subjective. Upload a video of it running to YouTube and then post a link to the video here.
Some are just slow no matter what you do, they're old, my best running truck is the brand new one that I just opened.
Make sure to let them warm up, some go good right away, others take a long time. The motors get tired, I've searched and those Mabuchi box motors with the side contacts and the long shaft are not available anywhere that I could find.
The quickest fix for slow vehicles is to increase the voltage with a different power pack or power supply. I separated my lane power and I'm running two older AFX Tripower power packs at 8 volts, one works fine too , they can do 8-12-22 volts. That one extra volt really wakes them up, underpowered to begin with IMO. If you're careful you can run them at 12V but not at full throttle.
Last edited by a moderator:
For what it's worth, I've noticed that continued maintenance as you break in a long-mothballed chassis makes for a gradual but noticeable improvement in performance. All of my motor pool is secondhand, and a lot of it seems to have lived a hard life before finding its way to me.
I'm not sure if Tyco used sintered brass bushings in their motors, or if those bushings were originally oil-impregnated. Just as well that's an area I pay a lot of attention to in particular because they seem to dry out fairly quickly the first few weeks I own a chassis, as if the brass were taking-up the oil or something. After disassembling, cleaning and re-lubricating a chassis I'll run it for a while and add another drop of oil to the motor shaft bushings after the original drop has had a chance to be drawn down the shaft by capillary action.
I'm not sure if Tyco used sintered brass bushings in their motors, or if those bushings were originally oil-impregnated. Just as well that's an area I pay a lot of attention to in particular because they seem to dry out fairly quickly the first few weeks I own a chassis, as if the brass were taking-up the oil or something. After disassembling, cleaning and re-lubricating a chassis I'll run it for a while and add another drop of oil to the motor shaft bushings after the original drop has had a chance to be drawn down the shaft by capillary action.
So, here we go…
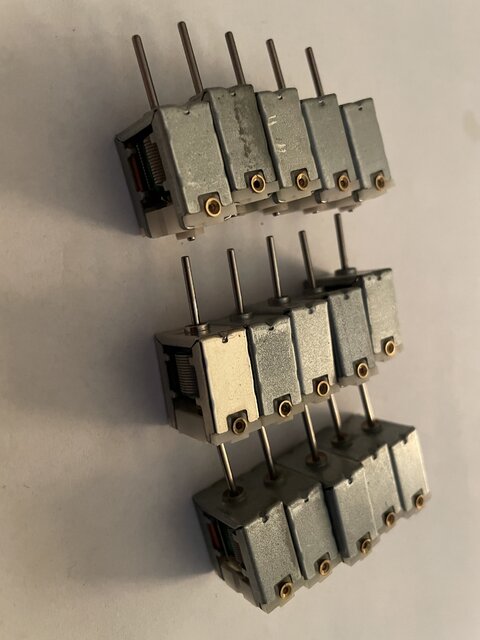
Motors, motors, motors…
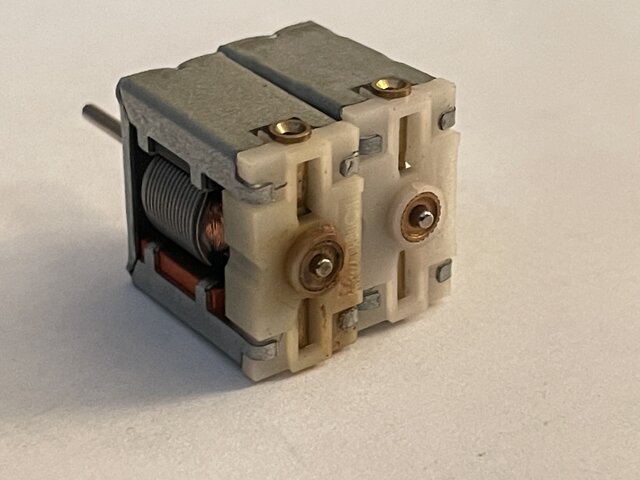
If your motor looks like the left one, your truck isn’t going to run very well.. if at all.. you can bend those four fingers back and release the rear can of the motor.
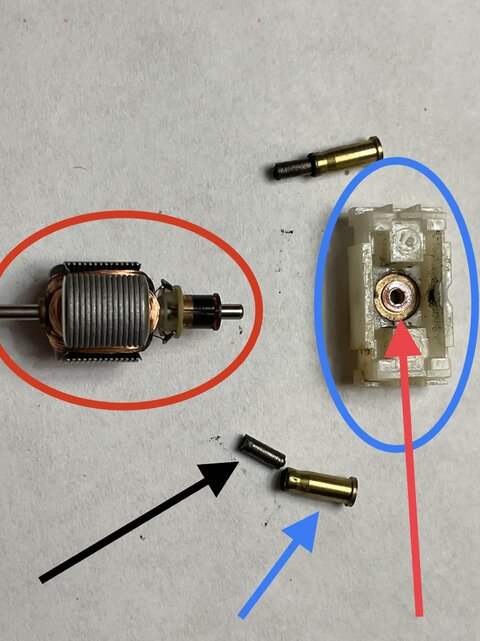
Red circle is the armature of the motor. Blue circle is the rear can. It holds the brushes, rear bushing and supports the rear of the armature. Red arrow is the rear bushing. Blue arrow is the brush holder, black arrow is the brush.
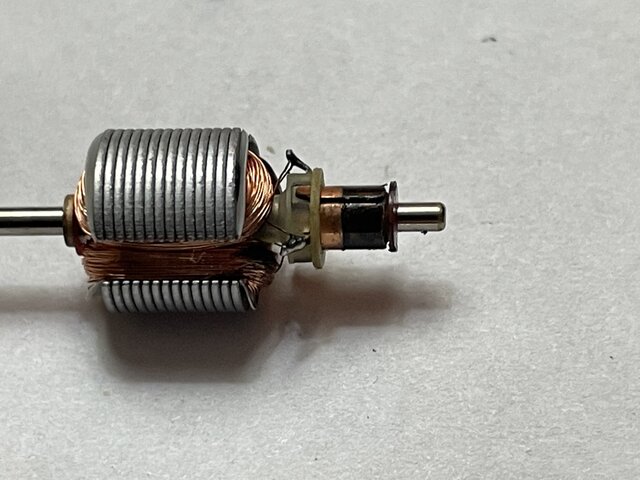
This armature is a hot pile of garbage. It is possible to polish this commutator up, but these motors aren’t really worth the effort to take apart and fix.
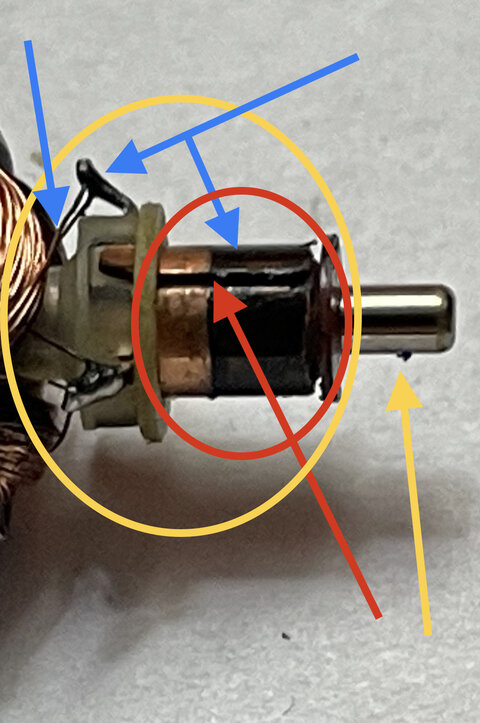
Yellow circle is called the commutator, IIRC. The commutator is what directs the power through the armature to basically turn it into an electromagnet. This is shown by the blue arrows. The red circle shows the segments. There are three segments to this armature phasing at 120 degrees each. The red arrow is an air gap that separates each segment. If any foreign debris allows two segments to join electrically it isn’t good. The yellow arrow is where the armature goes into the rear bushing. That debris shown can affect the motor performance.
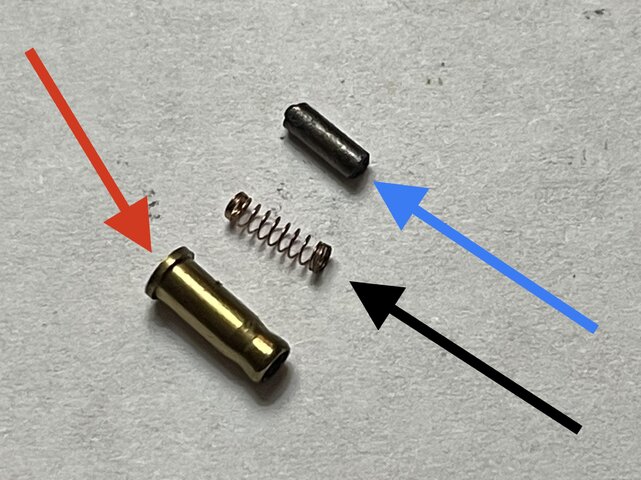
Red arrow is the brush holder, black arrow is a spring that both provides constant tension keeping the spring on the commutator, and provides some electrical contact between the power source and the brush. The brush holder itself provides most of this power flow. Blue arrow is the brush.
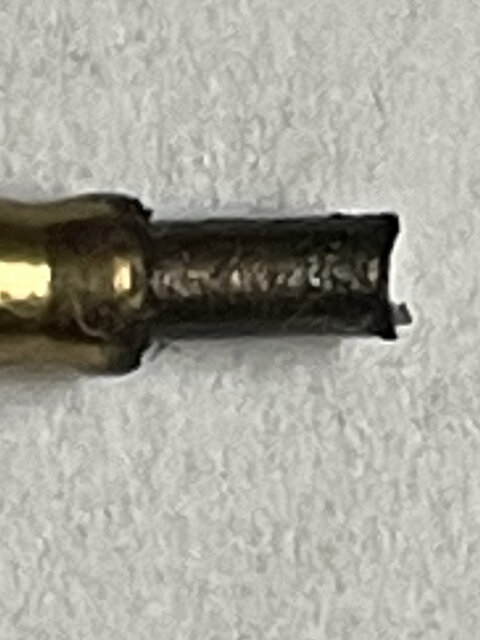
Upclose pic of the brush. The concave look is from wear rubbing against the commutator. Which is what made the black area on it. These brushes are more than likely a carbon type, with maybe a metal impregnation. As the motor works the brush is constantly worn. Hense this particular motor has had an asston of use on it. This is what caused the rusty dirty look on the rear can. This dust is what causes the black dirt on the inside of the body. I already knew this motor was trash looking at it.
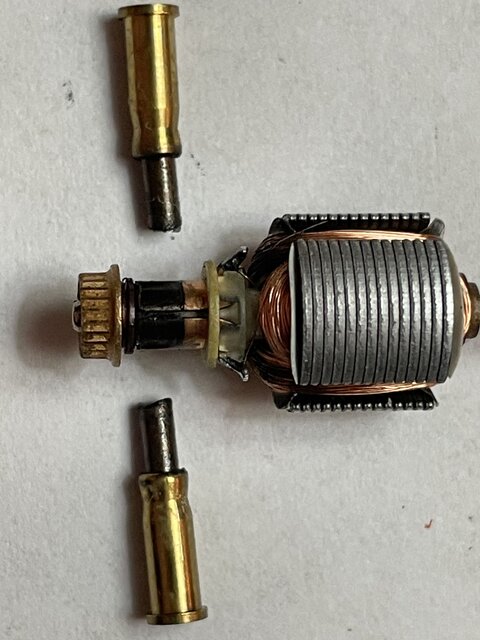
Here is the assembly how it would look, minus the rear can. The brushes would be completely against that nasty black area. This motor would run very badly.
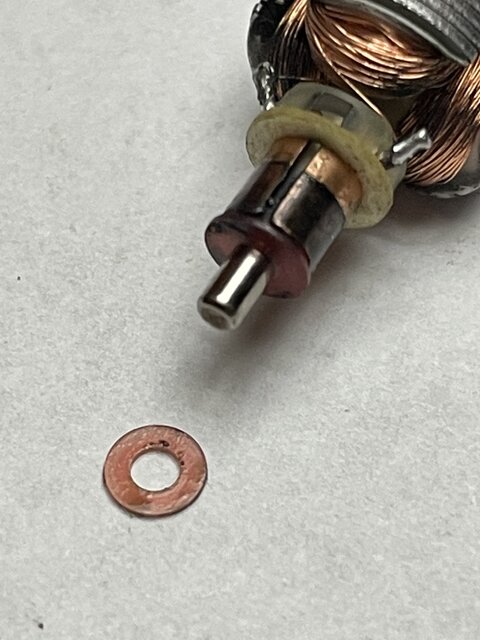
And, here we have the bone of contention. This is why I am not a proponent of oiling the motors. The small disk sits on the axle and provides a buffer between the armature rear flange and the bushing. Whether is was oil impregnated or not, the axle and bushing are machined to a very tight tolerance, yet not so tight that the motor cannot spin. The armature has enough run out that the small disk isn’t in constant stress or pressure. The chrome plating on the axle provides a slick surface, and the bushing being bronze is soft enough to wear in.
Oiling the motor is what caused all that black tar on the commutator. The dust from the brushes was absorbed by the oil, and stuck, causing it to burn the comm. It also probably caused more heat and wear than if the motor had never been oiled. Then the dust combined with the oil filling the air gap between the segments, which if you watch a motor run it will spark, and that is why, as the segments get electrically joined. One segment in contact with the positive side brush, while another segment is in contact with the negative side. And the oil also corroded and infused in the brush, giving it that appearance.
Your slots run different speeds because they are all “individuals”.. There are many variables in the equation. I’m guessing at the given 7.9 VDC of the power pack, the motor probably turns around 1,800-2,200 RPM. Any deviation in voltage will drop the RPM of it. Between the power pack itself, the connection to the terminal, the line drop through the rails, pick-up shoe contact, pick-up shoe to motor ear resistance, motor ear to brushes, it all factors in. As well as how the gears are worn, and how the tires are worn, and given their circumference.
Only by blue printing and ensuring each and every part is symmetrical and within a spec would you be able to have every slot run the same, every time.

Motors, motors, motors…

If your motor looks like the left one, your truck isn’t going to run very well.. if at all.. you can bend those four fingers back and release the rear can of the motor.

Red circle is the armature of the motor. Blue circle is the rear can. It holds the brushes, rear bushing and supports the rear of the armature. Red arrow is the rear bushing. Blue arrow is the brush holder, black arrow is the brush.

This armature is a hot pile of garbage. It is possible to polish this commutator up, but these motors aren’t really worth the effort to take apart and fix.

Yellow circle is called the commutator, IIRC. The commutator is what directs the power through the armature to basically turn it into an electromagnet. This is shown by the blue arrows. The red circle shows the segments. There are three segments to this armature phasing at 120 degrees each. The red arrow is an air gap that separates each segment. If any foreign debris allows two segments to join electrically it isn’t good. The yellow arrow is where the armature goes into the rear bushing. That debris shown can affect the motor performance.

Red arrow is the brush holder, black arrow is a spring that both provides constant tension keeping the spring on the commutator, and provides some electrical contact between the power source and the brush. The brush holder itself provides most of this power flow. Blue arrow is the brush.

Upclose pic of the brush. The concave look is from wear rubbing against the commutator. Which is what made the black area on it. These brushes are more than likely a carbon type, with maybe a metal impregnation. As the motor works the brush is constantly worn. Hense this particular motor has had an asston of use on it. This is what caused the rusty dirty look on the rear can. This dust is what causes the black dirt on the inside of the body. I already knew this motor was trash looking at it.

Here is the assembly how it would look, minus the rear can. The brushes would be completely against that nasty black area. This motor would run very badly.

And, here we have the bone of contention. This is why I am not a proponent of oiling the motors. The small disk sits on the axle and provides a buffer between the armature rear flange and the bushing. Whether is was oil impregnated or not, the axle and bushing are machined to a very tight tolerance, yet not so tight that the motor cannot spin. The armature has enough run out that the small disk isn’t in constant stress or pressure. The chrome plating on the axle provides a slick surface, and the bushing being bronze is soft enough to wear in.
Oiling the motor is what caused all that black tar on the commutator. The dust from the brushes was absorbed by the oil, and stuck, causing it to burn the comm. It also probably caused more heat and wear than if the motor had never been oiled. Then the dust combined with the oil filling the air gap between the segments, which if you watch a motor run it will spark, and that is why, as the segments get electrically joined. One segment in contact with the positive side brush, while another segment is in contact with the negative side. And the oil also corroded and infused in the brush, giving it that appearance.
Your slots run different speeds because they are all “individuals”.. There are many variables in the equation. I’m guessing at the given 7.9 VDC of the power pack, the motor probably turns around 1,800-2,200 RPM. Any deviation in voltage will drop the RPM of it. Between the power pack itself, the connection to the terminal, the line drop through the rails, pick-up shoe contact, pick-up shoe to motor ear resistance, motor ear to brushes, it all factors in. As well as how the gears are worn, and how the tires are worn, and given their circumference.
Only by blue printing and ensuring each and every part is symmetrical and within a spec would you be able to have every slot run the same, every time.
Just find a fast dump truck and semi chassis and switch bodies, like Motorific. You can only run two at a time anyway, lol.
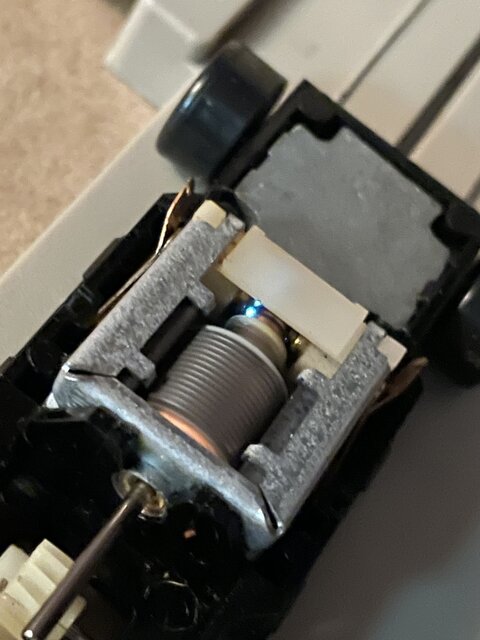
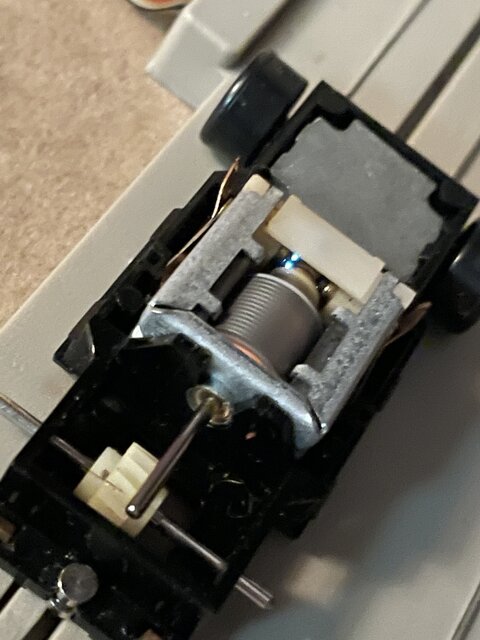
Put the motor back together, it runs, quite well, actually.. lol, can see the two distinct arcs from that garbage comm..
Just find a fast dump truck and semi chassis and switch bodies, like Motorific. You can only run two at a time anyway, lol.
But.. but.. I have 4 garages, and 4 or 5 fire stations, so, I can run, um, what, 10 trucks??
If I wasn’t such a set hoarding whore, I’d dump every set but my 3336 and just add accessories into it.. Trying to place out those 186 track parts in sets was a nightmare.. I’ll never gather everything at one time like that again…
That’s probably the easiest thing to do.Just find a fast dump truck and semi chassis and switch bodies, like Motorific. You can only run two at a time anyway, lol.
Again I’m in awe of your very in-depth explanation, but I’m not knowledgeable nor confident enough to attempt taking apart my slow vehicle’s motor. However, I am still going to attempt to figure out what’s causing it to run slower than I’d like. One thing I found is a small hairline crack on the front side of this motor that you identified as the armature. This side is shown in your photo titled Motors, motors, motors. The hairline crack goes from the brass point upward to the indentation. (hope I described it correctly). Also, and this may or may not make a difference, but this motor doesn’t want to sit tight in place, it rocks side to side very, very slightly.So, here we go…
View attachment 742
Motors, motors, motors…
View attachment 743
If your motor looks like the left one, your truck isn’t going to run very well.. if at all.. you can bend those four fingers back and release the rear can of the motor.
View attachment 744
Red circle is the armature of the motor. Blue circle is the rear can. It holds the brushes, rear bushing and supports the rear of the armature. Red arrow is the rear bushing. Blue arrow is the brush holder, black arrow is the brush.
View attachment 745
This armature is a hot pile of garbage. It is possible to polish this commutator up, but these motors aren’t really worth the effort to take apart and fix.
View attachment 746
Yellow circle is called the commutator, IIRC. The commutator is what directs the power through the armature to basically turn it into an electromagnet. This is shown by the blue arrows. The red circle shows the segments. There are three segments to this armature phasing at 120 degrees each. The red arrow is an air gap that separates each segment. If any foreign debris allows two segments to join electrically it isn’t good. The yellow arrow is where the armature goes into the rear bushing. That debris shown can affect the motor performance.
View attachment 747
Red arrow is the brush holder, black arrow is a spring that both provides constant tension keeping the spring on the commutator, and provides some electrical contact between the power source and the brush. The brush holder itself provides most of this power flow. Blue arrow is the brush.
View attachment 748
Upclose pic of the brush. The concave look is from wear rubbing against the commutator. Which is what made the black area on it. These brushes are more than likely a carbon type, with maybe a metal impregnation. As the motor works the brush is constantly worn. Hense this particular motor has had an asston of use on it. This is what caused the rusty dirty look on the rear can. This dust is what causes the black dirt on the inside of the body. I already knew this motor was trash looking at it.
View attachment 749
Here is the assembly how it would look, minus the rear can. The brushes would be completely against that nasty black area. This motor would run very badly.
View attachment 750
And, here we have the bone of contention. This is why I am not a proponent of oiling the motors. The small disk sits on the axle and provides a buffer between the armature rear flange and the bushing. Whether is was oil impregnated or not, the axle and bushing are machined to a very tight tolerance, yet not so tight that the motor cannot spin. The armature has enough run out that the small disk isn’t in constant stress or pressure. The chrome plating on the axle provides a slick surface, and the bushing being bronze is soft enough to wear in.
Oiling the motor is what caused all that black tar on the commutator. The dust from the brushes was absorbed by the oil, and stuck, causing it to burn the comm. It also probably caused more heat and wear than if the motor had never been oiled. Then the dust combined with the oil filling the air gap between the segments, which if you watch a motor run it will spark, and that is why, as the segments get electrically joined. One segment in contact with the positive side brush, while another segment is in contact with the negative side. And the oil also corroded and infused in the brush, giving it that appearance.
Your slots run different speeds because they are all “individuals”.. There are many variables in the equation. I’m guessing at the given 7.9 VDC of the power pack, the motor probably turns around 1,800-2,200 RPM. Any deviation in voltage will drop the RPM of it. Between the power pack itself, the connection to the terminal, the line drop through the rails, pick-up shoe contact, pick-up shoe to motor ear resistance, motor ear to brushes, it all factors in. As well as how the gears are worn, and how the tires are worn, and given their circumference.
Only by blue printing and ensuring each and every part is symmetrical and within a spec would you be able to have every slot run the same, every time.
I bought one of these high performance Armatures from SCC a while back to put in a TYCO 440 or 440-X2 Style chassis. I've always wondered if some of the US1 Armatures varied back in the day. Totally clueless on the topic.

Again I’m in awe of your very in-depth explanation, but I’m not knowledgeable nor confident enough to attempt taking apart my slow vehicle’s motor. However, I am still going to attempt to figure out what’s causing it to run slower than I’d like. One thing I found is a small hairline crack on the front side of this motor that you identified as the armature. This side is shown in your photo titled Motors, motors, motors. The hairline crack goes from the brass point upward to the indentation. (hope I described it correctly). Also, and this may or may not make a difference, but this motor doesn’t want to sit tight in place, it rocks side to side very, very slightly.
Honestly, as I said, it’s not really worth taking them apart and trying to fix them.
About the only thing you could fix would be replacing the brushes, but as shown in my post, the brushes are so long that they would almost never wear to the point they need replaced.
And the pics I shown in the post were taken with full zoom on my phone camera. In reality those parts are super small, and there is a procedure to put everything back together. And because of the spring length of the brush spring, you can easily launch the brushes like a rocket, at which point you would probably never find them again.
Is seems what you’re saying is that rear plastic piece is split from the bushing in the direction of the “notch”. Also be aware that notch should face down in the chassis. And there should be one magnet that is either red, yellow, white, or will have some color of paint on it. That magnet side should also be down, and the painted mark is on the same side as the notch. If you can see that mark/notch with the motor installed, your car will run backward.
I don’t really think that crack will affect the actual operation of the motor. The brushes have that spring behind them, and the spring is long enough that it should always provide the tension to the brush to keep it in contact.
But the fact the motor is loose can be an issue. The way the motor gear sits on the axle gear, just the slightest lift of that gear changes the pitch of it and will reduce the gear ratio. AFAIK the motor gear “teeth” come to a point, and the closer to the point the less area it has to engage the axle gear.
This affects the speed that it turns the axle.
About the only two things you can do is replace the chassis, or just run the car as is. You could replace the motor, but that would involve either stripping another car down, or just buying another car to get the chassis/motor anyway. I do see chassis for sale often enough, and they aren’t super expensive like buying an entire car.
If you do decide buy say a 3901-3904 car for a replacement, make SURE it has the brown gears in it. Don’t set yourself up buying a white geared chassis that has a 50/50 chance of being cracked..
I bought one of these high performance Armatures from SCC a while back to put in a TYCO 440 or 440-X2 Style chassis. I've always wondered if some of the US1 Armatures varied back in the day. Totally clueless on the topic.
View attachment 753
This are custom wound arms for racing. Someone smarter than me knows them real good, and knows how to get the exact 3.5 ohms resistance via the windings.
The Tyco stock US-1 arms I think are like 7.5 ohms, I’ve wanted to put a meter across a few and see for sure.
What I can say is given an 8 volt supply from a stock AC adapter, at the 2 amp, which relates to 16 watts, that 3.5 ohm arm would output over twice, if not even possibly three times the “power” of the stock US-1 arm.
You have to get into Ohm’s law and some electrical knowledge to figure out the true potential, but that’s the gist of it.
I appreciate everyone’s shared advice and suggestions regarding my original post and thought all of you would like a follow up. So, I discovered that I hadn’t changed the white gear that sits in the middle of the rear axle. I had purchased a set of gears from eBay. I replaced the original white one and, lo and behold, my black Firebird runs much better to my satisfaction. This apparently resolved this issue.


TYCO US1 Trucking Replacement & Repair Parts
tycous1trucking.com
Users who are viewing this thread
Total: 2 (members: 0, guests: 2)
